
I’m much more likely to put vodka or wine in there, but lately, I’ve been obsessed with altering vintage teacups.

Taking crafty to a whole other level
I’m much more likely to put vodka or wine in there, but lately, I’ve been obsessed with altering vintage teacups.

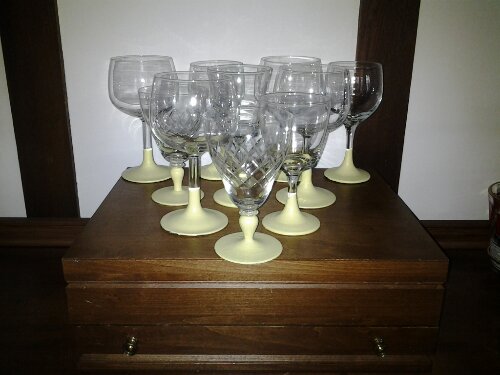
I cannot drink wine from a plastic cup, I just can’t. So I needed to get extra wine glasses for our holiday dinner at the cottage, where I have only 4 wine glasses! Again, the various thrift stores yielded a nice mismatch of shapes and sizes. I saw chalboard-dipped glasses on Pinterest but my black paint was old and totally separated. I did have tiny jars of colored chalkboard paint (used to sell them at my store, craft stores carry them) so I picked a light yellow/green and brushed it onto the bottom of the glasses. I didn’t dip for 2 reasons: not enough paint to get high enough on the stem and I didn’t want paint on the bottom, which could rub off on the furniture.
The paint can’t go in the dishwasher but we usually hand wash glasses anyhow. I picked out red chalk for people to scribble with, I’ll post pics after the party(ies)

With Christ-nukkah around the corner and lots if entertaining at the cottage, I did an inventory (opened the cupboard) and realised I am seriously lacking in any type of serving dishes there.
So I stopped by the thrift store and picked up what I like to think of as ‘somebody’s grandma’s heirlooms’…. Not my heirlooms, well, not yet!
I also got a bunch of pressed glass things that I want to reinvent… Stay tuned!


A few months back, my husband and I were driving in the car when I jumped out at a red light and shoved this in the truck of his car:

It was so…. worn out! But the lady in the car behind us, who had to wait while I closed the truck, gave me a big thumbs up and didn’t even honk when she almost missed the light!
So this beauty has been in my basement for months, waiting for it’s makeover. I really didn’t know where I was going to put it, so I wasn’t sure how to re-finish it. But then last week, out of nowhere, I realised there was nothing on the stair landing. Nowhere for my kids to put down something they was to remember to bring down in the morning… So that would be it’s home, and thus, I knew what to do with it.
First, I took it apart. Oh the glamorous side of re-upholstery.
 A Coat of primer helped a lot:

And here it is, in the landing, all dressed up and awaiting the library books that will surely find their way on it at night. I’m thinking of printing a picture of the finished product, putting it in a thank you card and dropping it off at the house where I got it….


It’s a good thing I’m always working on different projects. Right here at the cottage, I found everything I needed to gut and put the chair back together. The primer, paint, stuffing and left over fabric, the only thing I needed was a staple gun, but I was seriously lacking one of those, as evidenced by the miles of cables stuck to walls with tape! So after I finish the chair, I will FINALLY tack all these cables where they belong.
Here is chair #2, mid-makeover. The knitting is done, but I have to paint the legs before I can start to reassemble it…

Again, get your mind out of the gutter!
No, I’m talking about sprucing things up around here a little… It all started with the attention my telephone bench re-do got. It may show up somewhere in the near future, but the lovely people on that blog asked me to take a new picture and "style it a little". So I took everything I knew from design shows, magazines and my recent photo class and came up with a more stylish way to present my telephone bench:
Clearly, I don’t live like this! The perfectly draped alligator scraf (incomplete, still needs finishing!), the carefully placed baby rain boots (5 sizes too small for anyone in this house!), but it does make a super cute vignette!
And it inspired me to spruce things up around the old craft blog, starting with a masthead I made myself! Aren’t you impressed? I’m not Photoshop expert, but a little creativity goes a long way.
When we got the country house 2 winters ago, we took a bunch of extra furniture from our house and brought it up there, then we filled in the holes with inexpensive antiques (ie nice used furniture!) and flea market finds. We got spectacular school desks to act as nightstands, a vintage green tweed couch, an old stereo credenza that we use as a TV unit…. you get the idea. One of our finds was this telephone bench, which resides on the little wall between the entrance and the kitchen.
 As you can see, it had seen better days. I liked the lines of it and the pure utility of it. The kids could sit on it to put on their shoes (or rather, to have us put on their boots!) and we could keep a few key items, like the phone book and scotch tape. My original thought had been to strip it and re-stain it or just wax it. But there is plenty of wood in this house already. And I’ve been noticing on lots and lots of design/decorating blogs people painting old furniture in really funky, bright, shiny colors, giving it a completely different look. Not shabby chic with wood showing through, just really bright, almost lacquered paint.
So 2 cans of lime-colored shiny spray paint and a fake-vintage tea towel later, I present the new and MUCH improved telephone bench:


 For some reason, it looks milky in the pictures, but trust me, it’s very, very shiny! It just pops off the blue wall and sets off very nicely against the floor. I was going to use one of my real vintage Vera tea towels, but in the end, I just didn’t have it in me to cut one up. So instead, I grabbed a Sukie tea-towel from the UK, something I used to sell at the store. It’s actually perfect, the green in the background of the beach scene goes very well with the paint and I like that it’s a beach shack in a ski cottage!
I did strip it first, because the finish was so old and uneven, I didn’t want the shiny paint to show to many defects. But one evening of stripping and 2/3 coats of spray paint…. not bad, not bad at all!


